So, this is it, my last blog (I know I am going to cry too!). It has been a wild ride and I have enjoyed every minute of it. So like the last episode of many sitcoms here is my flashback blog looking at all this project has achieved.
I first encountered this project as part of my work placement. Sarah Joomun, Project Officer at the time, welcomed me, explained about the project and told me what I was going to do. After two months of identifying specimens, writing narratives, locating missing specimens, and attempting to read illegible writing my time here was done. I then returned as Sarah moved jobs. This was it, my first ever proper museum job and boy was I going to rock it. What have I done in this time? Short answer: lots.
I am most proud of my blogs, and many things have inspired them. The first thing that intrigued me was finding “Sow.” written on the backs of tablets. Researching this led me to finding all about the Sowerby family as well as some of Lyell’s other friends and family. I have always loved how some of Lyell’s fossils show predator/prey relationships and so “Exploring Borings” was born. These blogs are a product of my inspiration and I hope they have inspired you.
One of my favourite bored specimens
You may remember from last month I was playing with structured light scanning and that was definitely one of my highlights from this project. It created some really amazing 3D images of the fossils. In total I created 3D images of 30 fossils which were chosen because they were pretty. I mean, why else would you pick specimens to digitise?
Pretty specimen chosen to scan
I had a lot of fun discovering quirks from people who have worked on the collection previously. Whether it was Lyell writing as yet uncrackable codes on the back of his tablets, curators not trusting information or ignoring original writing, it has led to a lot of bemused head scratching. I am sure one day all will become clear but I am sad to say that it won’t be because of me.
I may be gone but I am not forgotten, at least for the next 2 months. Presenting… Charles Lyell is currently on display in the museum. If you want to know what it’s about, come and have a look!
Each year the Museum works with members of the community on a wide variety of projects using our collections to enthuse and engage people in natural history. These projects often result in some amazing outcomes but until now we have been unable to find the right space to celebrate this work in the Museum. So this month we are very happy to unveil our new Community Case, dedicated to doing just that.
Stories from Stone, Body and Bone in the new community case
Our opening display focuses on the Children in Need-funded Story Makers programme. In partnership with Fusion Arts, this initiative helps Oxford primary school pupils to develop their communication skills by taking inspiration from museum collections. And this year they teamed up with us to create Stories from Stone, Body and Bone.
Pupils from New Marston, Wood Farm, and Rose Hill Primary schools worked with Story Makers founder and arts psychotherapist Helen Edwards in two visits to the Museum, stimulating and developing imaginative ideas, stories and artwork.
During these visits the Story Makers met with our education officer Chris Jarvis and together they looked at rocks and minerals, tectonic plate formation, and the evolution of skeletons and animal posture. They explored the collections creatively through sensory observation, using the hands, body and senses to develop self-awareness and self-confidence.
Getting creative with chalks and textiles
We work with the children as artists and we carefully designed a series of sessions that enabled them to have direct sensory engagement with objects in the museum. We then used art processes to portray their experiences and feelings about their interactions. Helen Edwards, Integrative Arts Psychotherapist
Back at school, the pupils used visual art, drama, movement and modelling to communicate feelings and ideas that emerged from these museum encounters, sharing thoughts with the group in a playful and trusting atmosphere.
Group sessions back at school involving movement, drama and art
Detail from one of the Stone Age caves
Each Story Maker then created a Stone Age character – someone who might dream up and pass on stories full of meaning and myth. They imagined places in which their Stone Age characters might live, thinking about what they might see looking out from these spaces, through the cracks, crevices and windows in their caves.
From these ideas emerged beautiful, bright, and colourful models of these fictional abodes, as well as stories and poetry about their characters.
Story Makers built the children’s capacity to think reflectively, enriching their speech and language, and helped them to develop their writing skills as the stories were compiled into Story Makers books.
Stone Age houses and landscapes as part of the Stories from Stone, Body and Bone project
Everyone should get to do this, it is like a dream come true Story Maker, from the Stories from Stone, Body and Bone project
Stories from Stone, Body and Bone is on display until Sunday 21 May in our new Community Case. The next display, installed on 22 May, will feature artwork by our community of artists who use the collections as inspiration for their work.
Over the last two weeks in the Lyell collection I have been sorting out the “Notes” field for the USA specimens. This has involved transcribing labels, tablets and markings on specimens and it has led to finding some rather odd practices. These have left me scratching my head and asking why or how, sometimes both.
The first mystery we have is probably my favourite and probably the most annoying. If you follow my twitter you will know I have had some problems working out what some original text actually says. Well this tablet in the grand scheme of things is pretty easy to read. LOOK AT WHAT SOMEONE HAS DONE! They have attached a label over the original writing. The worst part is there is space on the tablet that has no writing. What were they thinking?
Attaching a label over legible text… disaster!
Another fun thing I have come across in the database is the previous volunteer curator didn’t finish transcribing tablets, instead he just wrote “[etc.]” if the information repeated what was on the front. I guess I can forgive him as he was writing them out by hand before entering them into a database but it is still amusing to come across them.
There are some mysteries that come from Lyell himself. Symbols and codes written on the back of tablets the meaning of which still eludes us. I feel like I am working on a jigsaw that doesn’t have all the pieces. They aren’t gone forever but instead they’re just waiting to be found.
Theta symbol on tablet reverse linking this specimen to another
Another quirk from the previous volunteer curator is that he didn’t trust loose labels or the backs of tablets. This slowly became evident when removing unnecessary comments from the “Localities” field. Anything written on the front of the tablet was taken to be the truth but you were strongly warned about anything from the reverse or a loose label by comments such as “per tablet reverse” and “per loose label”. We think that actually the back of the tablets were what was being worked on by Lyell and friends and his scribe wrote the information onto the front of the tablet.
It is important to remember all the changes that have happened with technology and the views towards best practice, so these people will have been doing the best with what they had. I am in no doubt that 50 years down the line people will look at what we were doing and think “WHY?”
Can your brain rewire itself? How is the brain built and what can go wrong? And should the secondary school day start later to compensate for teenage sleep patterns?
Here we present a selection of videos from the exhibition. The full set is available on our YouTube channel now. And if you’re not able to visit the exhibition itself, we’ve built a special Brain Diaries website which contains all that neuroscience goodness.
Is brain-building a tricky business? Professor Zoltán Molnár of the University of Oxford specialises in the development of the brain. In this video he talks about the complex processes at play during the brain’s early development, including how things can sometimes go wrong.
Can my brain rewire itself? Associate Professor Holly Bridge works in the Nuffield Department of Clinical Neurosciences in the John Radcliffe Hospital in Oxford. Her research focuses on using MRI scans of the human brain to understand the organisation of the visual system in people with normal vision and in those with abnormal visual function. Here she talks about how the brain can rewire itself to compensate for damage to certain sensory areas.
School’s out – should the school day start later? Dr Christopher-James Harvey works at the Sleep and Circadian Neuroscience Institute at the University of Oxford. As part of the Teensleep research project, he is investigating how changes in the natural rhythm of sleep in adolescents, and the effects of sleep education, might impact on academic, health and sleep outcomes. Here he talks about initiatives to trial a later starting time for the secondary school day.
To read more about Brain Diaries and see the full programme of public events see braindiaries.org.
Wondrous things have been going on in the Charles Lyell Project recently! I have been using a really cool piece of kit that uses structured light scanning to produce a 3D image of the fossils. The best thing is it’s called the Space Spider and looks like a gadget from Star Trek, maybe a high tech whisk or iron. Using this, and a very helpful assistant, you can produce a complete 3D image in 15 – 40 minutes depending on how large and complicated the specimen is and how many times you mess up (assistant sold separately).
This is what you can create!
So for anyone who has, or now wants to have, a Space Spider (and the Artec Studio 11 Professional software that goes with it) this is how I used it…
1. Be patient
It takes quite a long time to warm up. It will say it has 10 minutes left which is actually about an hour. Bring a book or something to do. It is worth the wait.
If you are dealing with large specimens or complex specimens the scans will take up a lot of memory meaning occasionally the program will freeze.
2. Scan as much as possible
In your first scan you want to cover as much of the specimen as possible to make it easier when it comes to alignment later. We started off with two complete scans of the specimen in two different orientations, adding more later if necessary, unless it was obvious we had missed something.
Using the real time fusion setting makes it much easier to see when scanning.
3. Just because the machine is high tech doesn’t mean you need to be
It is easier to put the specimen on something that rotates such as the turntable baker’s use to ice cakes. We did not have this so instead we used a plastic box. However we noticed that we were losing tracking more often than we were before. It was because of the box being reflective (this was also seen when it reflected off rings). So we used powder free vinyl gloves to cover the box solving the problem.
High tech meets very low tech
4. Get rid of the floaters
There is often some noise generated by the scan, whether it has picked up a bit of table or you accidentally scanned your finger when turning the box. This can be removed in the editing part of the software. We found using the lasso or rectangle to be the easiest. Doing this after every scan rather than after scanning is complete will make it easier.
Don’t worry about getting every single one, you can get rid of the rest later using the small object filter!
5. Alignment
It was usually a bit of trial and error with the alignment but if you have done two really good scans you can get it in one go. To align you set similar points on the two scans, it is best to aim for 3 but has worked with 2.
One silly mistake that is really easy to make (especially when you are tired) is putting the points on and pressing apply without actually aligning them. Back to the beginning you go!
Three points used to align the two scans
6. The thing you have to do and I don’t know why
Globally register the scans. I don’t know what it means or what it does but you have to do it before you can move on.
Don’t question, just do.
7. The rest of the tools
After globally registering your scans you can use the other tools.
First: Fast fusion. There are two other types of fusion, sharp and smooth, but this one is much faster and gives good results. Only fuse the scans without texture as you add this later.
Second: Small object filter. This gets rid of any pesky floaters still remaining after fusing.
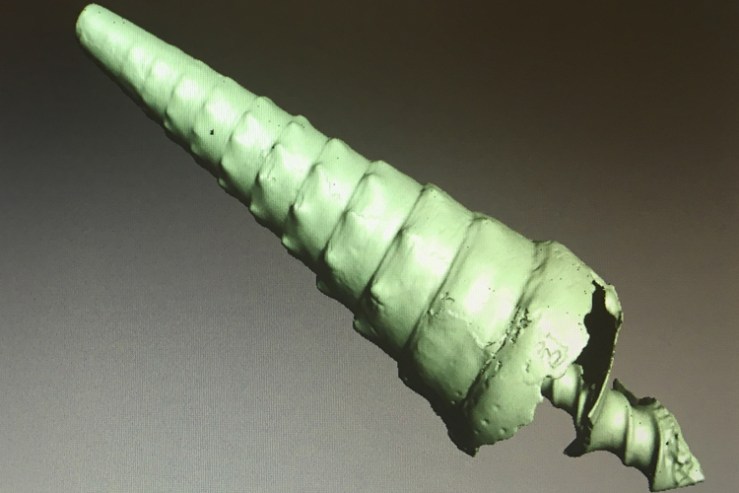
Specimen before hole filling, looking pretty good though
Third: Hole filler. Does what it says on the tin, fills any holes that are in the scan. This is particularly useful for apertures of gastropods as the scanner can’t always get into them.
8. Weird lumps
So you have fused your scans, got rid of holes and the last standing floater but oh no there’s a weird lump on your scan that’s not on your specimen, disaster! Don’t fear the smoothing brush is here. In editor there is a smoothing brush (located above erase) which you can adjust the size of and get rid of any pesky lumps and bumps.
9. Going back
If none of the above has worked to fill a gap or there’s an odd bit go back and add another scan. Then repeat stages 2-8. If not move on and feel proud that you got it in one go.
10. Adding texture
At this stage you should have a beautiful 3D model but it will be one solid colour, not like the outside of the specimen at all. So to get the specimen looking its best you go to the texture tab. Highlight the scans that you want to use. The standard and recommended settings work well for this.
It will save your project. This is the point you feel glad that someone remembered to save it. This bit takes a little while (not more than 5 minutes) so you may want to refer to the book or activity from before.
You can use the sidebar to change brightness, saturation and other fun things. The most entertaining setting to play with is the hue; you can make the specimens any colour (even making them look mouldy).
Once you are happy, apply it.
This is with texture added
11. Save again
Pat yourself on the back for remembering.
12. Export
Exporting scans in a PLY format will give you the scans without the texture.
I recommend exporting meshes which has the texture export format as jpg. This gives you a PLY file with texture this time.
13. You’re done
Well done you have reached the end. My record was 15 minutes.
Just a few final tips:
Remember to press apply so you don’t lose the changes you have made
Try to remember to save as you go along
Play with the settings until you find what you need
Don’t be afraid of trial and error
If it freezes just give it a minute, it usually comes back.