Over the last two weeks in the Lyell collection I have been sorting out the “Notes” field for the USA specimens. This has involved transcribing labels, tablets and markings on specimens and it has led to finding some rather odd practices. These have left me scratching my head and asking why or how, sometimes both.
The first mystery we have is probably my favourite and probably the most annoying. If you follow my twitter you will know I have had some problems working out what some original text actually says. Well this tablet in the grand scheme of things is pretty easy to read. LOOK AT WHAT SOMEONE HAS DONE! They have attached a label over the original writing. The worst part is there is space on the tablet that has no writing. What were they thinking?
Attaching a label over legible text… disaster!
Another fun thing I have come across in the database is the previous volunteer curator didn’t finish transcribing tablets, instead he just wrote “[etc.]” if the information repeated what was on the front. I guess I can forgive him as he was writing them out by hand before entering them into a database but it is still amusing to come across them.
There are some mysteries that come from Lyell himself. Symbols and codes written on the back of tablets the meaning of which still eludes us. I feel like I am working on a jigsaw that doesn’t have all the pieces. They aren’t gone forever but instead they’re just waiting to be found.
Theta symbol on tablet reverse linking this specimen to another
Another quirk from the previous volunteer curator is that he didn’t trust loose labels or the backs of tablets. This slowly became evident when removing unnecessary comments from the “Localities” field. Anything written on the front of the tablet was taken to be the truth but you were strongly warned about anything from the reverse or a loose label by comments such as “per tablet reverse” and “per loose label”. We think that actually the back of the tablets were what was being worked on by Lyell and friends and his scribe wrote the information onto the front of the tablet.
It is important to remember all the changes that have happened with technology and the views towards best practice, so these people will have been doing the best with what they had. I am in no doubt that 50 years down the line people will look at what we were doing and think “WHY?”
Can your brain rewire itself? How is the brain built and what can go wrong? And should the secondary school day start later to compensate for teenage sleep patterns?
Here we present a selection of videos from the exhibition. The full set is available on our YouTube channel now. And if you’re not able to visit the exhibition itself, we’ve built a special Brain Diaries website which contains all that neuroscience goodness.
Is brain-building a tricky business? Professor Zoltán Molnár of the University of Oxford specialises in the development of the brain. In this video he talks about the complex processes at play during the brain’s early development, including how things can sometimes go wrong.
Can my brain rewire itself? Associate Professor Holly Bridge works in the Nuffield Department of Clinical Neurosciences in the John Radcliffe Hospital in Oxford. Her research focuses on using MRI scans of the human brain to understand the organisation of the visual system in people with normal vision and in those with abnormal visual function. Here she talks about how the brain can rewire itself to compensate for damage to certain sensory areas.
School’s out – should the school day start later? Dr Christopher-James Harvey works at the Sleep and Circadian Neuroscience Institute at the University of Oxford. As part of the Teensleep research project, he is investigating how changes in the natural rhythm of sleep in adolescents, and the effects of sleep education, might impact on academic, health and sleep outcomes. Here he talks about initiatives to trial a later starting time for the secondary school day.
To read more about Brain Diaries and see the full programme of public events see braindiaries.org.
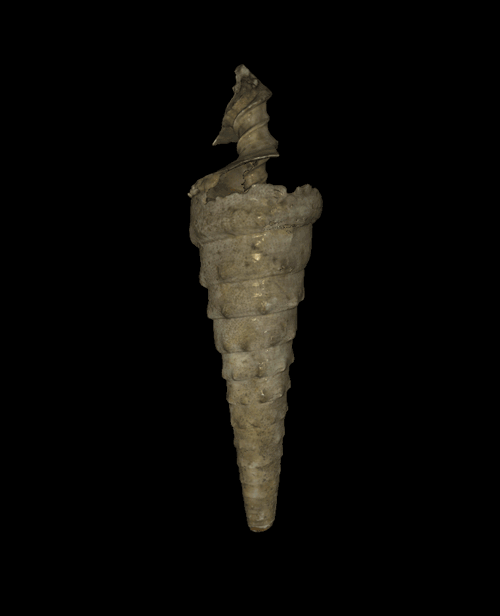
Wondrous things have been going on in the Charles Lyell Project recently! I have been using a really cool piece of kit that uses structured light scanning to produce a 3D image of the fossils. The best thing is it’s called the Space Spider and looks like a gadget from Star Trek, maybe a high tech whisk or iron. Using this, and a very helpful assistant, you can produce a complete 3D image in 15 – 40 minutes depending on how large and complicated the specimen is and how many times you mess up (assistant sold separately).
This is what you can create!
So for anyone who has, or now wants to have, a Space Spider (and the Artec Studio 11 Professional software that goes with it) this is how I used it…
1. Be patient
It takes quite a long time to warm up. It will say it has 10 minutes left which is actually about an hour. Bring a book or something to do. It is worth the wait.
If you are dealing with large specimens or complex specimens the scans will take up a lot of memory meaning occasionally the program will freeze.
2. Scan as much as possible
In your first scan you want to cover as much of the specimen as possible to make it easier when it comes to alignment later. We started off with two complete scans of the specimen in two different orientations, adding more later if necessary, unless it was obvious we had missed something.
Using the real time fusion setting makes it much easier to see when scanning.
3. Just because the machine is high tech doesn’t mean you need to be
It is easier to put the specimen on something that rotates such as the turntable baker’s use to ice cakes. We did not have this so instead we used a plastic box. However we noticed that we were losing tracking more often than we were before. It was because of the box being reflective (this was also seen when it reflected off rings). So we used powder free vinyl gloves to cover the box solving the problem.
High tech meets very low tech
4. Get rid of the floaters
There is often some noise generated by the scan, whether it has picked up a bit of table or you accidentally scanned your finger when turning the box. This can be removed in the editing part of the software. We found using the lasso or rectangle to be the easiest. Doing this after every scan rather than after scanning is complete will make it easier.
Don’t worry about getting every single one, you can get rid of the rest later using the small object filter!
5. Alignment
It was usually a bit of trial and error with the alignment but if you have done two really good scans you can get it in one go. To align you set similar points on the two scans, it is best to aim for 3 but has worked with 2.
One silly mistake that is really easy to make (especially when you are tired) is putting the points on and pressing apply without actually aligning them. Back to the beginning you go!
Three points used to align the two scans
6. The thing you have to do and I don’t know why
Globally register the scans. I don’t know what it means or what it does but you have to do it before you can move on.
Don’t question, just do.
7. The rest of the tools
After globally registering your scans you can use the other tools.
First: Fast fusion. There are two other types of fusion, sharp and smooth, but this one is much faster and gives good results. Only fuse the scans without texture as you add this later.
Second: Small object filter. This gets rid of any pesky floaters still remaining after fusing.
Specimen before hole filling, looking pretty good though
Third: Hole filler. Does what it says on the tin, fills any holes that are in the scan. This is particularly useful for apertures of gastropods as the scanner can’t always get into them.
8. Weird lumps
So you have fused your scans, got rid of holes and the last standing floater but oh no there’s a weird lump on your scan that’s not on your specimen, disaster! Don’t fear the smoothing brush is here. In editor there is a smoothing brush (located above erase) which you can adjust the size of and get rid of any pesky lumps and bumps.
9. Going back
If none of the above has worked to fill a gap or there’s an odd bit go back and add another scan. Then repeat stages 2-8. If not move on and feel proud that you got it in one go.
10. Adding texture
At this stage you should have a beautiful 3D model but it will be one solid colour, not like the outside of the specimen at all. So to get the specimen looking its best you go to the texture tab. Highlight the scans that you want to use. The standard and recommended settings work well for this.
It will save your project. This is the point you feel glad that someone remembered to save it. This bit takes a little while (not more than 5 minutes) so you may want to refer to the book or activity from before.
You can use the sidebar to change brightness, saturation and other fun things. The most entertaining setting to play with is the hue; you can make the specimens any colour (even making them look mouldy).
Once you are happy, apply it.
This is with texture added
11. Save again
Pat yourself on the back for remembering.
12. Export
Exporting scans in a PLY format will give you the scans without the texture.
I recommend exporting meshes which has the texture export format as jpg. This gives you a PLY file with texture this time.
13. You’re done
Well done you have reached the end. My record was 15 minutes.
Just a few final tips:
Remember to press apply so you don’t lose the changes you have made
Try to remember to save as you go along
Play with the settings until you find what you need
Don’t be afraid of trial and error
If it freezes just give it a minute, it usually comes back.
Charles Lyell’s amazing collection of fossils in the OUMNH got me thinking about why he (and others) collected these fossils. Was it for a purely academic purpose or was there something else? In fact, why does anyone collect fossils? Why do you? There are countless reasons that people collect fossils: for research, for fun, because they’re there, for art and crafts (to name a few), but I think the reason at the heart of any collection is for the love of fossils.
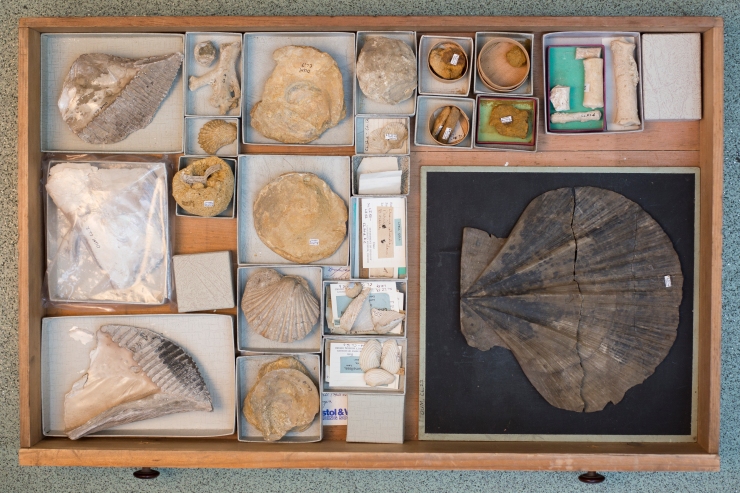
Former Project Officer Sarah Joomun’s favourite drawer. Her reason: “When I first started this is what it looked like and it was the first drawer in the collection. It seems to contain the odds and ends of the Lyell Collection, things that didn’t seem to fit anywhere else. When I used the drawer in a tour for a group of alumni from the Earth Science Department, the enormous broken Pecten shell inspired one of the alumni, a man who was long past his student days, to re-enact his impression of a Pecten swimming from his student days, complete with whooshing backwards and flapping hands. It was very intentionally hilarious“
The Charles Lyell Collection is made up of mainly molluscs (bivalves, gastropods, scaphopods). However it does contain some vertebrate material such as sharks teeth and a partial rhinoceros jaw, as well as giant foraminifera (single-celled planktonic animals with a chalky shell). The collection is from a variety of different localities in Europe and North America. The majority of specimens come from North America, with France a close second.
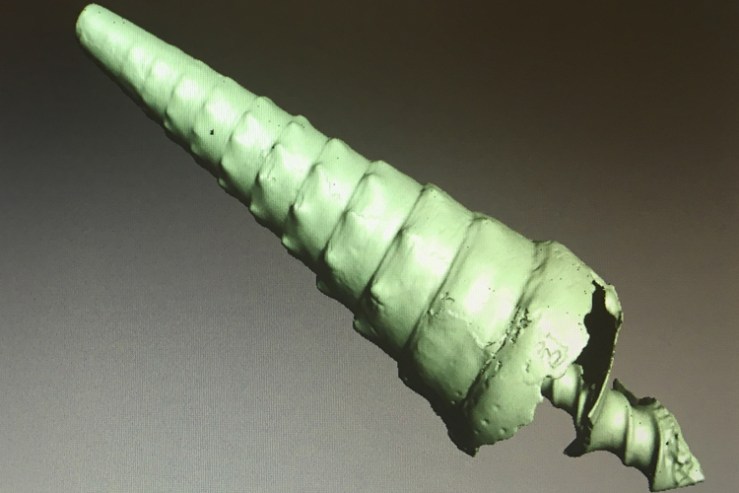
One of my favourite gastropods. I found this by accident when looking for interesting specimens, I fell in love with it as it is so pretty and spiky.
The molluscs in the collection are often systematically presented on wooden tablets indicating that he collected the fossils for research. However it does raise more questions. Why? What did he use the tablets for? Was it for ease of research or were they being displayed somehow? Why are they in different orientations? Was it to see all the parts or was it how they attached best? What features were highlighted? Were any ignored?
One of the interesting tablets from the collection, also one of Sarah Joomun’s favourites
I think that Charles Lyell was using them as a way to categorise the specimens he had either found in the field or that were given to him by other collectors. I also think the different orientations were to show the features of the specimens he collected, but some are in fairly random orientations. Pencil markings on the tablet reverse give information about where the specimen was collected and, on some, who actually collected it. They also give an identification. Sometimes there are multiple identifications with some given by other people (see Sowerby), and it also can say when Charles and friends think it’s a new species.
One of Earth Collection Manager Eliza Howlett’s favourite specimens because “xenophorids are really cool and I like the fact it has been ambitious enough to cement a whole bivalve to its shell“
This still leaves many questions unanswered, and I am afraid without talking to the man himself we may never find our answers.
I just hope whatever the reason you have for collecting, displaying and researching at first the underlying reason is simply for the love of fossils. I mean Charles Lyell himself even left his law career to pursue his childhood passion of geology.
I am really interested to know what you think: email me at lily.wilks@oum.ox.ac.uk
For the past nine months there has been a lot of moving going on around here. Imagine moving house endlessly for weeks on end, but where your house is full of bones, insects, fossils, rocks, and weird and wonderful taxidermy. And the location of everything has to be precisely recorded. The museum move project was a bit like that.
Project assistant Hannah Allum explains…
The museums are migrating, we declared in May 2016. And so they have. The first major stage of the stores project has been completed. After we had created inventories for the largely unknown collections held in two offsite stores, the next stage was to pack them safely and transport them to a new home nearer the museum, a job which demanded almost 70 individual van trips! We now have over 15,000 specimens sitting in vastly improved storage conditions in a new facility.
A miscellany of boxes for a collection of shells
Let’s revel in some numbers. All in all there were over 1,000 boxes of archive material, mostly reprints of earth sciences and entomological research papers; over 1,300 specimens of mammal osteology (bones); and more than 1,000 boxes and 650 drawers of petrological and palaeontological material (rocks and fossils).
Some of the more memorable specimens include old tobacco tins and chocolate boxes filled with fossils and shells; a beautifully illustrated copy of the ‘Report on the Deep-Sea Keratosa’ from the HMS Challenger by German naturalist Ernst Haeckel; and the skull of a Brazilian Three-banded Armadillo (Tolypeutes tricinctus), complete with armour-plated scute carapace.
The skull and carapace of a Brazilian Three-banded Armadillo (Tolypeutes tricinctus)
There were also a few objects that have moved on to more unusual homes. A 4.5 m long cast of Attenborosaurus conybeari (yep, named after Sir David) was too large to fit in our new store and so made its way to another facility along with a cornucopia of old museum furniture. A set of dinosaur footprint casts, identical to those on the Museum’s lawn, have been gifted to the Botanical Gardens for use at the Harcourt Arboretum in Oxford.
And last but not least, a model of a Utahraptor received a whopping 200 applications from prospective owners in our bid to find it a suitable home. After a difficult shortlisting process it was offered to the John Radcliffe Children’s Hospital and following a quarantine period should soon be on display in their West Wing.
Casts of footprints by made Megalosaurus, queuing for a lift to Harcourt Arboretum. Image: Hannah Allum
Fittingly, the final specimen I placed on the shelf in the new store was the very same one that had been part of my interview for this job: The skeleton of a female leopard with a sad story. It apparently belonged to William Batty’s circus and died of birthing complications whilst in labour to a litter of lion-leopard hybrids before ending up in the Museum’s collections in 1860.
The sad story of a performing leopard
Though the moving part of this project is now complete there is still plenty of work to do. We are now updating and improving a lot of the documentation held in our databases, and conservation work is ongoing. The new store will also become a shared space – the first joint collections store for the University Museums, complete by April 2018.
The Utahraptor model in the old store awaiting collection by its new owners.
Illustrated plate from the Report on the Deep-Sea Keratosa from the HMS Challenger by Ernst Haeckel
The title page of the Report on the Deep-Sea Keratosa from the HMS Challenger by Ernst Haeckel
On the van, off the van; on the van…
Boxes of Earth collections material stored safely and in sequence in the new store
Boxes, glorious boxes…
Rack ‘n’ Roll: Hannah deftly working the racking
Lily Wilks, an intern assisting with the inventory of bound reprints. Image: Hannah Allum
Hannah Allum working in the old store. Image: Edward Adcock
Life Collections Manager Mark Carnall and Project Assistant Hannah Allum carrying one of the final specimens, a Mirounga leonina (Southern elephant seal) skeleton, into the new store. Image: Edward Adcock
The Attenborosaurus fossil cast, in its unusually shaped case, en route to a new custom built support frame. Image: Hannah Allum
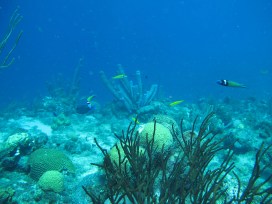
Under the sea, Curaçao, Caribbean. Image: Sancia van der Meij
By Sancia van der Meij, Research Fellow
Biologists often refer to the word “species” when they are talking about the animals or plants that they study, but just what exactly is a species? Defining ‘species’ is actually quite tricky…
A basic definition is based on the work of a German biologist called Ernst Mayr, whose simplified description is “a group of interbreeding populations that are reproductively isolated from other groups”. This is a great starting point, but it is difficult to use when studying animals in the field. Biologists therefore use breeding experiments in laboratories and, increasingly, genetics to help determine what a species is.
How and under which circumstances new species evolve remains an important topic in biology. Quite a lot is known about geographical barriers causing the formation of new and distinct species through evolution – a process known as speciation. Mountains, rivers and ocean currents, for example, can divide populations of single species and in the long run – thousands or millions of years – this isolation can cause different populations to evolve in separate, new species.
Gall Crab inhabiting a small tunnel in an Agaricia coral. Image: G van Moorsel
But a more difficult concept in speciation is how species can evolve in the same geographical area. Together with a colleague, I studied the genetic composition of Opecarcinus hypostegus, a tiny crab species, around 5 mm in size, that only occurs in the Atlantic Ocean. These Gall Crabs are adapted to living in stony corals and often show a clear preference for inhabiting closely related coral species.
Overhang in a Agaricia coral where a gall crab dwells. Image: Sancia van der Meij
We studied over 200 specimens from five different coral species, all collected from the Caribbean island of Curaçao. The results showed that O. hypostegus should be considered a single, valid species. But to our surprise, when we zoomed into the details of the genetic composition of the crab, we noticed small differences in the DNA of the crabs inhabiting the various coral species. With statistical tests we could prove that the variation in DNA was significantly different between the crabs inhabiting these five different Agaricia corals.
Gall crab dwelling in Agaricia coral. Image: Sancia van der Meij
Despite the fact that all the crabs live around the same small Caribbean island, it does appear that we see the very first signs of future speciation in the crab’s DNA. Unfortunately we will not be around to witness the new species as it will likely take several hundreds of thousands of years before the making of these new crab species has neared completion. But how exciting to witness its new beginnings?